Managing Members
One page for everyone in your workspace
All member management lives on the workspace Members page. Invite people, assign them to teams, set roles and managers, grant permissions, and review each person's tracked time from their profile — without hopping between team settings pages.
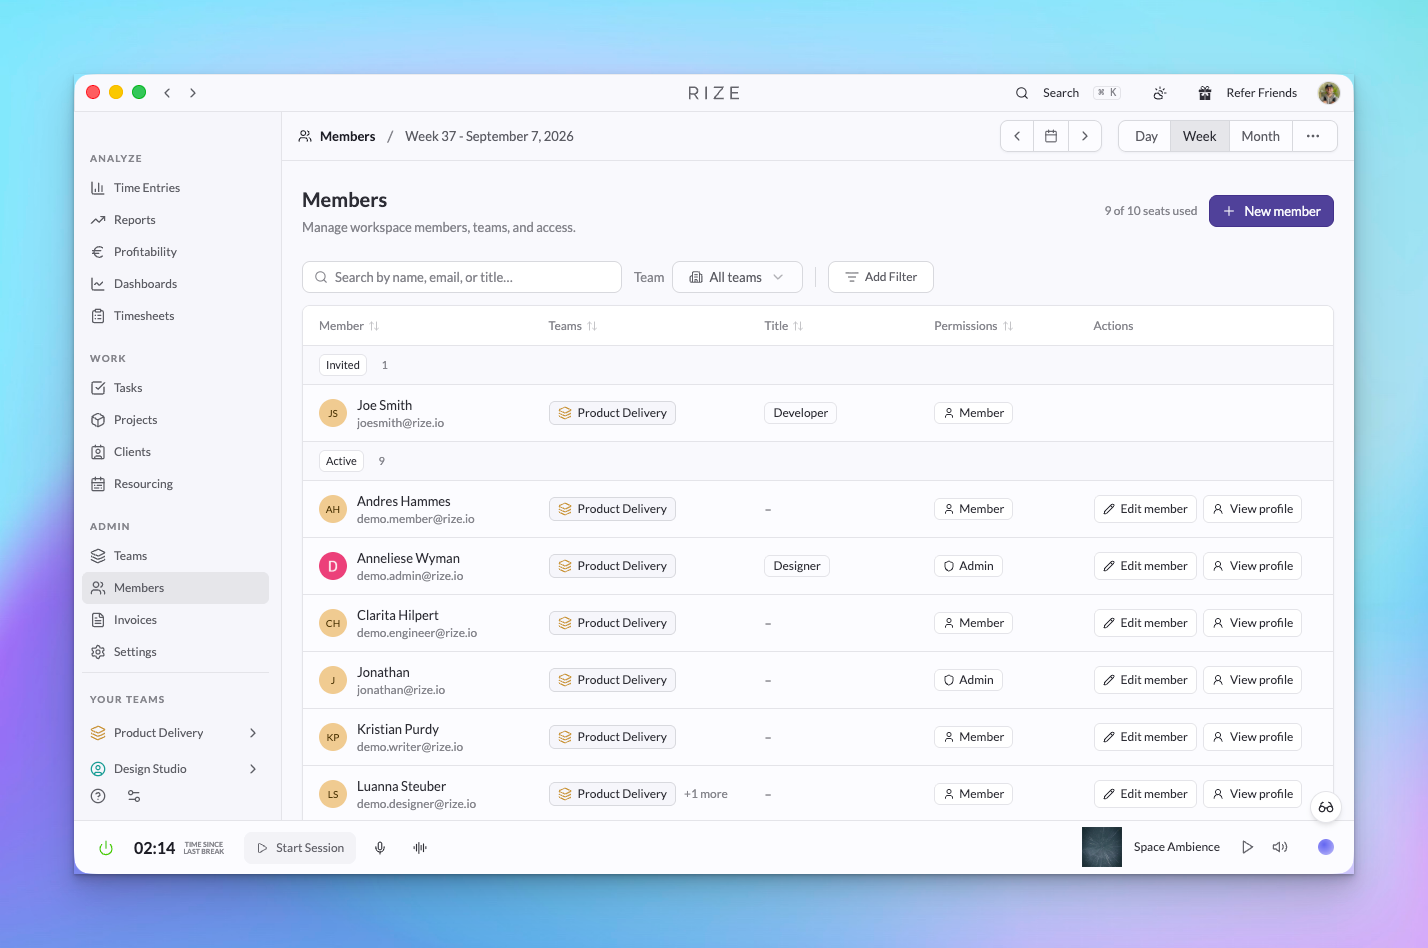
The Members page
Open Members from the sidebar to see your workspace's roster. Search by name, email, or title, then filter by team, role, or status. Active members have separate Edit member and View profile actions. Team settings pages no longer contain a member table — they link to the Members page pre-filtered to that team.
What you see on the roster depends on your own access:
- Workspace admins see everyone in the workspace, with a seat count beside New member.
- Team admins and viewers see everyone on their teams, including people with pending invitations.
- Managers see their direct reports (including invited ones) and themselves.
- Members without any management standing don't see other members here.
Rows are grouped by membership status:
- Invited and Rejected members have no edit or profile actions.
- Active members have View profile and, if you can manage them, Edit member.
- Deactivated members have a Reactivate action for workspace admins instead of edit or profile actions.
Inviting new members
Workspace admins can invite someone new with the New member button on the Members page. Rize automatically updates your subscription as members are added; new seats are charged at a prorated rate. Invited members receive an email and can accept the invitation from the Rize dashboard.
Editing a member
Click Edit member beside an active member. The dialog has General, Permissions, Agent, and Tracking tabs. Click Save changes to apply your edits. If you try to close with unsaved changes, Rize asks whether to discard them or keep editing.
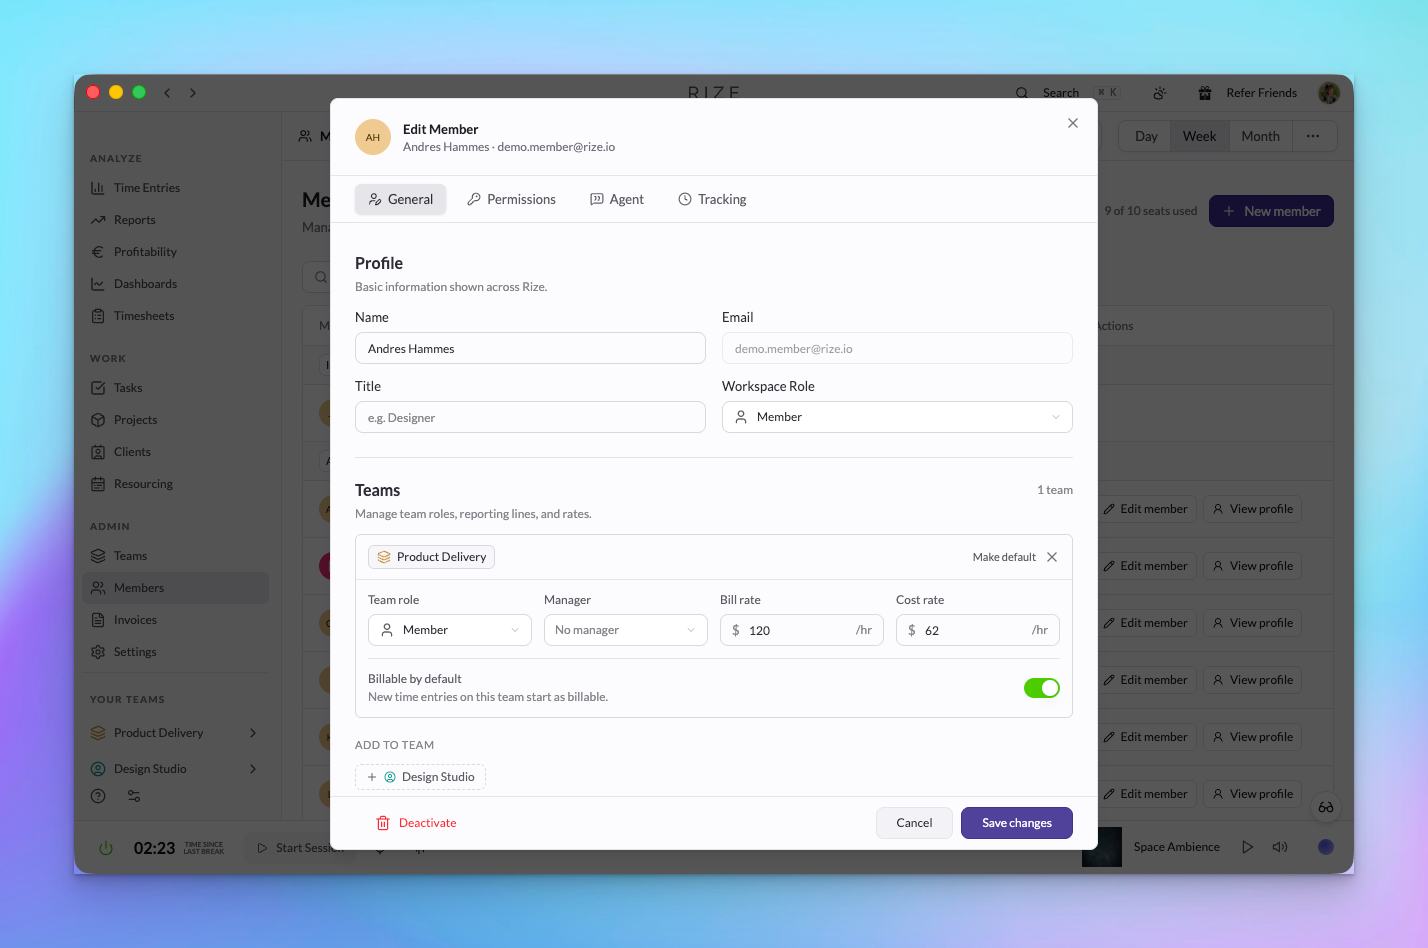
General tab
- Name and workspace role — Editable by workspace admins. You can also mark one of the member's teams as their default team.
- Title — A workspace-level job title, shown in the member list.
- Email — Read-only in this dialog.
- Team assignment cards — One card per team the member belongs to, each with:
- Team role — Admin, Manager, Member, or Viewer (see Roles and Permissions).
- Manager — A searchable select listing the team's admins and managers. Members can't be their own manager.
- Bill rate and cost rate — Editable here by workspace admins.
- Billable by default — Whether the member's new time entries on that team start as billable.
- Remove from team — Removes the membership (see below).
Team admins can edit the team-level fields for members of their teams even when they aren't workspace admins. Changing a member's name, workspace role, or finance permission requires an workspace admin.
Changing a member's role
Open the member
Go to Members and click Edit member beside the active member you want to change.
Change their team role
On the General tab, find the assignment card for the relevant team and pick Admin, Manager, Member, or Viewer from the role select.
Change their workspace role
On the Permissions tab, switch Workspace access between Admin and Member. Only workspace admins can do this, and the last remaining admin can't be demoted.
Permissions tab
- Workspace access — Admin or Member.
- Finance — Grants org-wide visibility into rates and profitability. Always on for workspace admins.
- Resourcing — Granted per team; unlocks capacity planning and editing others' time on that team. Always on for team admins.
Agent tab
Workspace admins and team admins of a member's active team can update that member's agent preferences.
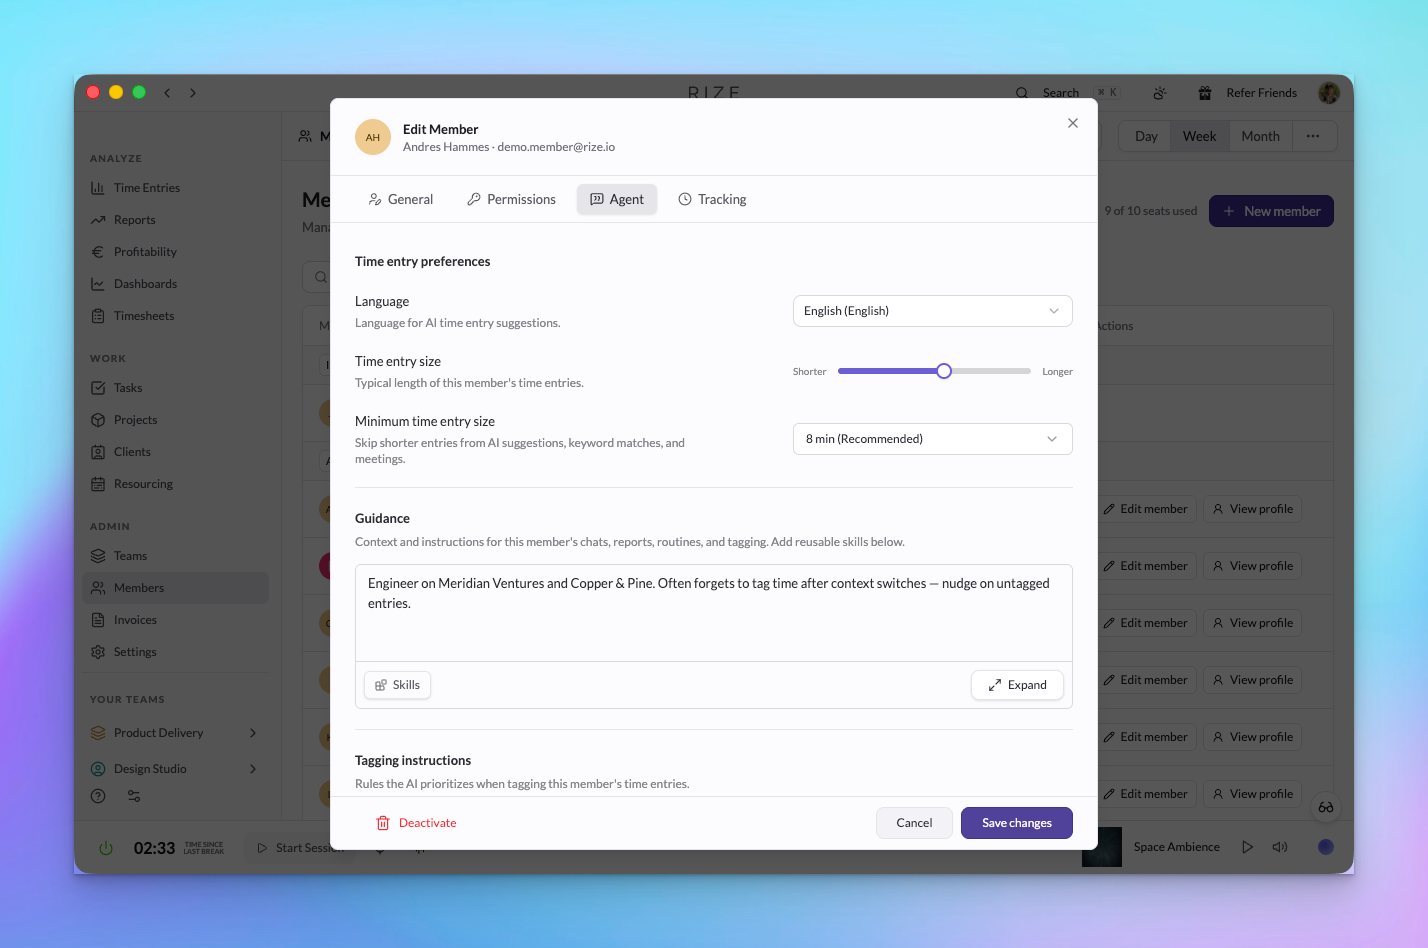
- Language — The language used for AI time entry suggestions.
- Time entry size — Adjust the typical length of the member's time entries from shorter to longer.
- Minimum time entry size — Skip shorter entries generated from AI suggestions, keyword matches, and meetings.
- Guidance — Context and instructions for the member's chats, reports, routines, and tagging.
- Tagging instructions — Rules the AI prioritizes when tagging the member's time entries.
- Activity summaries — Instructions for titles and descriptions of the member's time entries.
Use Skills to add reusable skills to an instruction field, or Expand for a larger editor. These preferences apply to the selected member, rather than the admin making the change.
Tracking tab
Workspace admins and team admins of a member's active team can change that member's time zone and automatic tracking schedule.
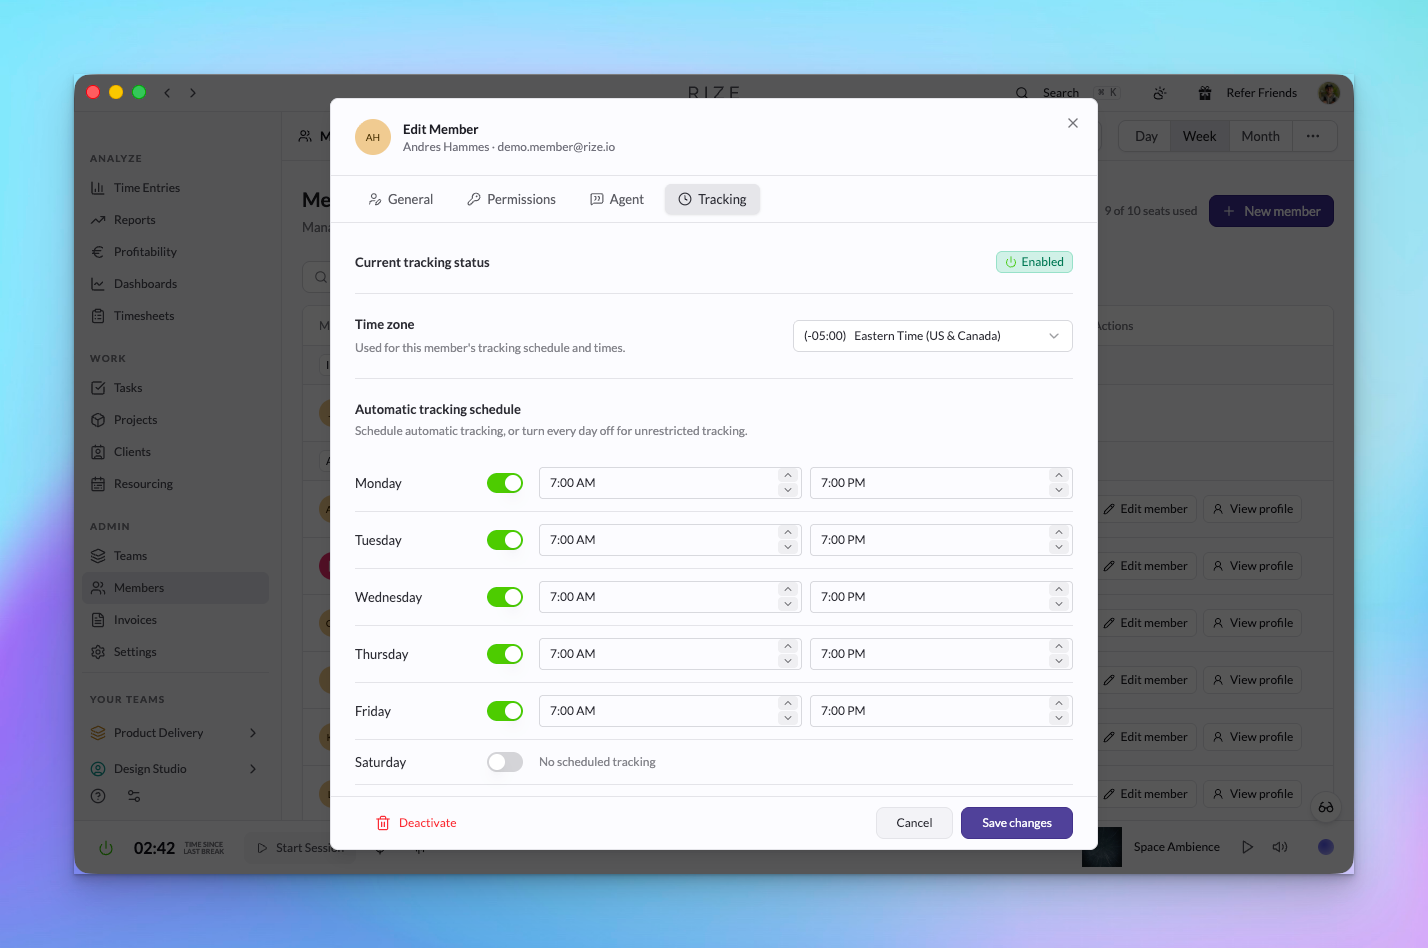
- Current tracking status — A read-only indicator of whether tracking is enabled or paused. It does not confirm that the member is online or actively recording time.
- Time zone — The time zone used for the member's schedule and times.
- Automatic tracking schedule — Enable each day you want scheduled tracking, then choose a start and end time. The start must be earlier than the end.
Turn every day off for unrestricted tracking. Members can manually override their schedule. If automatic scheduling is disabled in the member's account, the dialog displays a notice; the saved hours apply when scheduling is enabled.
Time zone and tracking preferences belong to the member's account, rather than an individual team. Click Save changes after editing.
Member profiles
Click View profile beside an active member to review their work.

- Overview — The member's teams, cards for Total, Approved, and Pending time, a daily chart stacked by label, and a label comparison breakdown.
- Timeline — The member's tracked time entries in a timeline view.
- Settings — Editable by workspace admins and team admins on one of the member's teams. Managers can view a report's profile but not change their settings.
Burn and report tables across Rize link to these profiles — use the View Profile action or the row chevron to jump from a report row to the person behind it.
Removing a member from a team
Use the remove action on a team assignment card to take a member off a team. Removal is reversible:
- The member's tracked time, rates, and title on that team are preserved.
- If you add them back to the team later, their previous membership — history included — is restored.
- If the team was the member's default workspace, that default is cleared.
- Anyone who reported to them on that team no longer has a manager assigned.
Deactivating and reactivating members
Deactivating removes a person's access to your workspace without deleting anything:
Deactivate
Click Edit member beside an active member and choose Deactivate. Their seat is freed, their team memberships are suspended, and all historical data is kept.
Reactivate anytime
Find the member in the Deactivated group and click Reactivate. This restores their access and team memberships.
Deactivation never deletes time entries, rates, or history. It's the right way to offboard someone whose data you may need for reporting, or who may return later. Rize also prevents deactivating the last workspace admin.